Mastering Button Controls: Android Games via Controller Mapping
Mastering Button Controls: Android Games via Controller Mapping
Quick Links
- What Is Button Mapping?
- How to Get Started With Button Mapping on Android
- How to Assign Buttons to an Android Game
Key Takeaways
- Button mapping is handy if you want to use your controller with Android games that don’t support it.
- You can use a button mapping app like Mantis Gamepad Pro to map buttons for various games on your Android device.
- You need to configure button mapping for each game individually. Mantis Gamepad Pro lets you assign each input on your controller to different parts of the screen.
Plenty of gamepads can turn your smartphone into a portable handheld, but only a minority of Android games actually support physical controls. Fortunately, you can solve this problem by mapping buttons to different parts of the screen using apps.
What Is Button Mapping?
Button mapping refers to the process of manually determining what happens when you press a button on your game controller or keyboard. When it comes to gaming on Android devices, it typically means getting games that lack controller support to work by telling buttons to activate different parts of the touchscreen.
For example, moving the analog stick can simulate dragging your thumb around the left side of the screen. Pressing theA button can imitate tapping on the right side of the screen. The task is easiest for games with a virtual game controller spread across the screen, since you can assign a physical button to the location of their virtual counterparts.
 ## How to Get Started With Button Mapping on Android
## How to Get Started With Button Mapping on Android

Close
Button mapping isn’t a built-in feature on Android, so you’ll need to use a third-party app like Mantis Gamepad Pro, which is one of the best options for the job.
Download: Mantis Gamepad Pro (Free, premium version available)
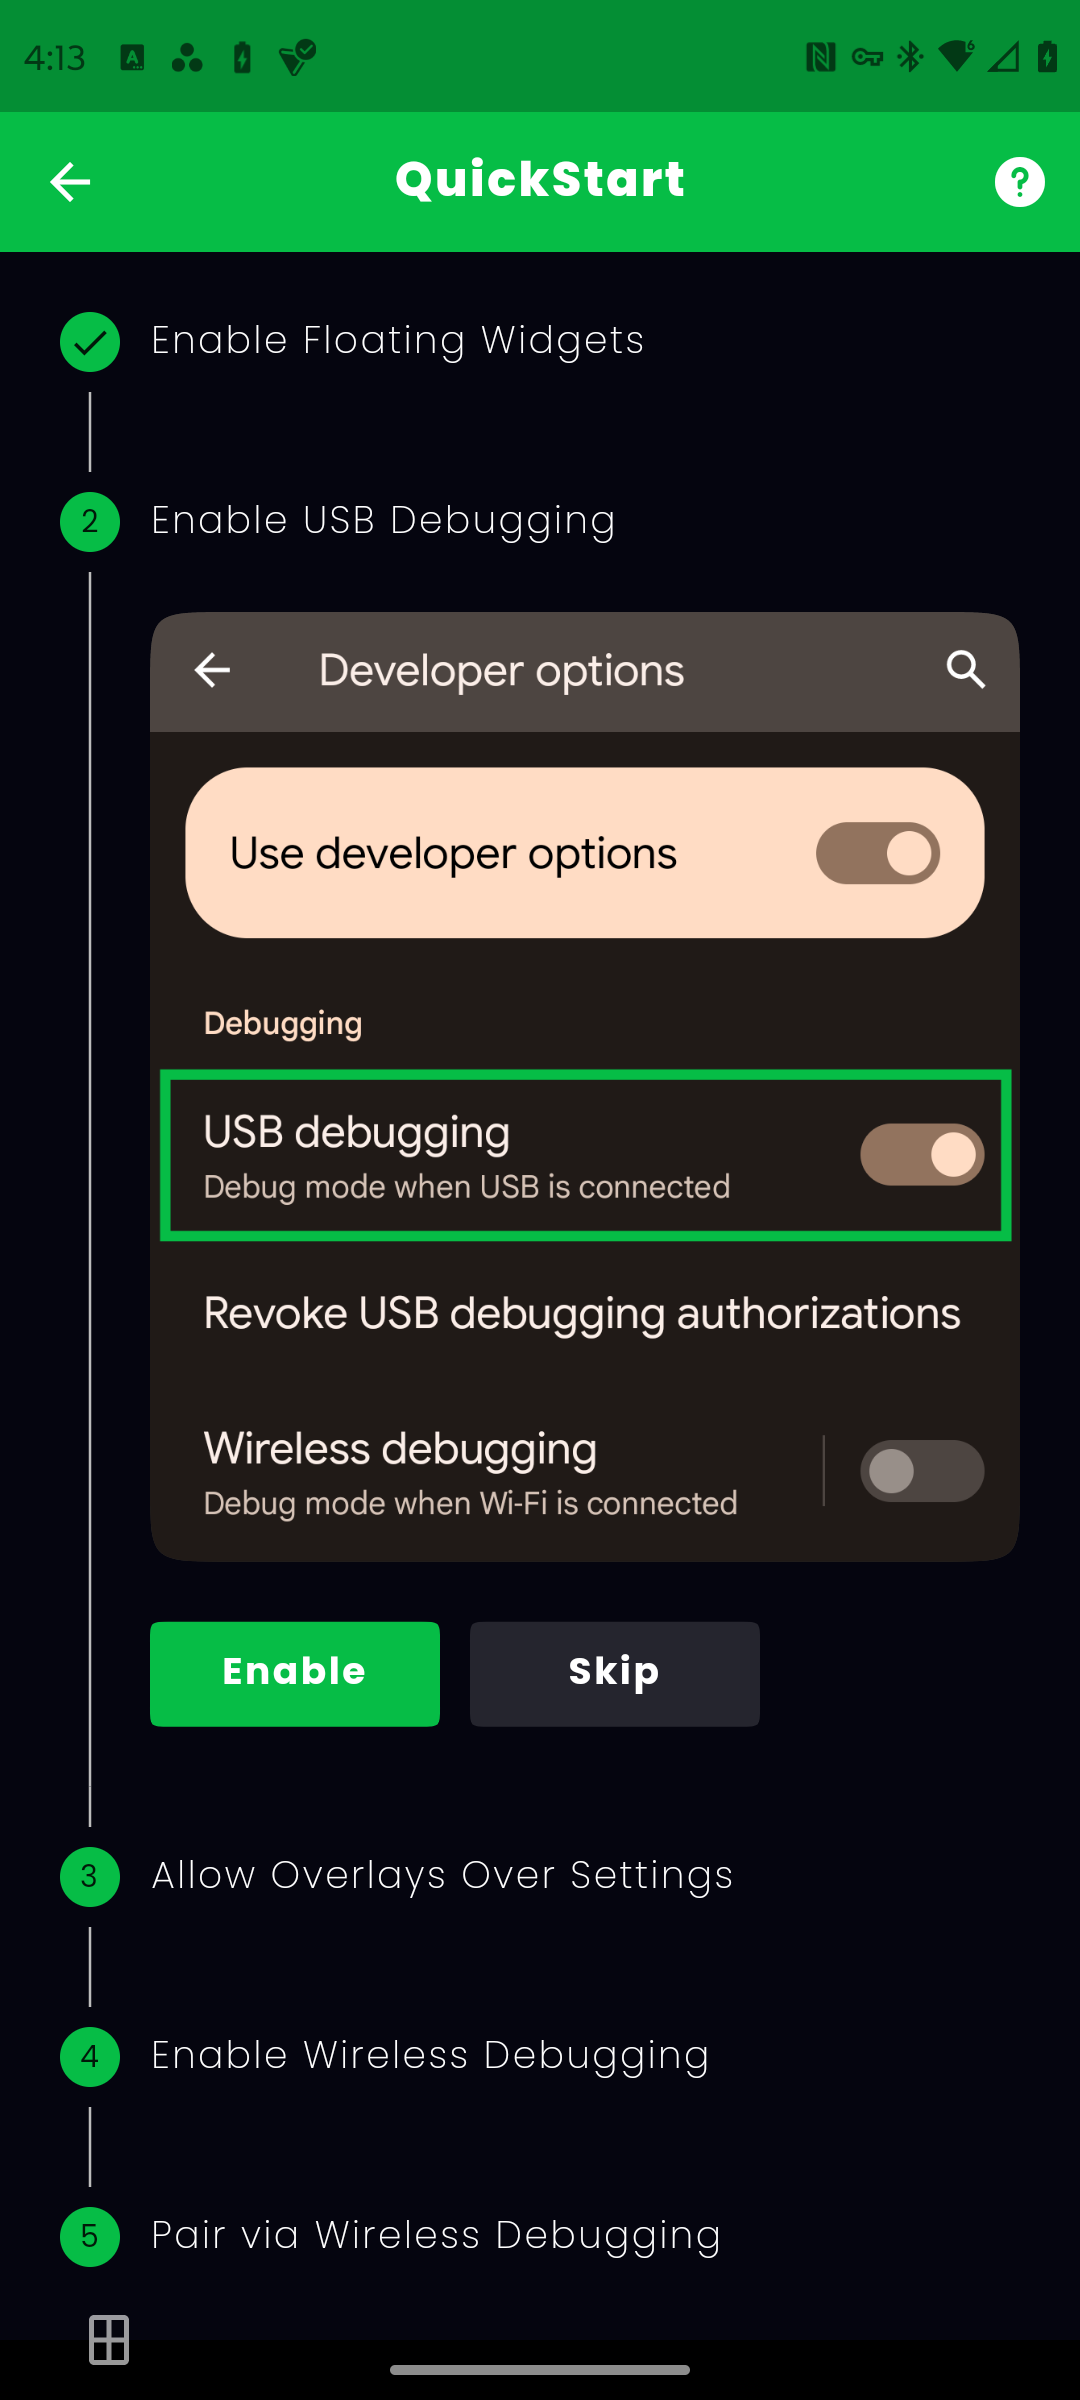
Once you install Mantis Gamepad Pro from the Play Store and open it, you have to jump through a series of hoops to activate it. The app does a good job of walking you through each step:
- Enable floating widgets: This allows the Mantis widget to float along the edge of your screen while you play a game.
- Enable USB debugging: This gives the app access to necessary parts of your phone in order to function.
- Allow overlays over settings: This allows Mantis to float instructions above other apps so that it can guide you through the settings you need to enable.
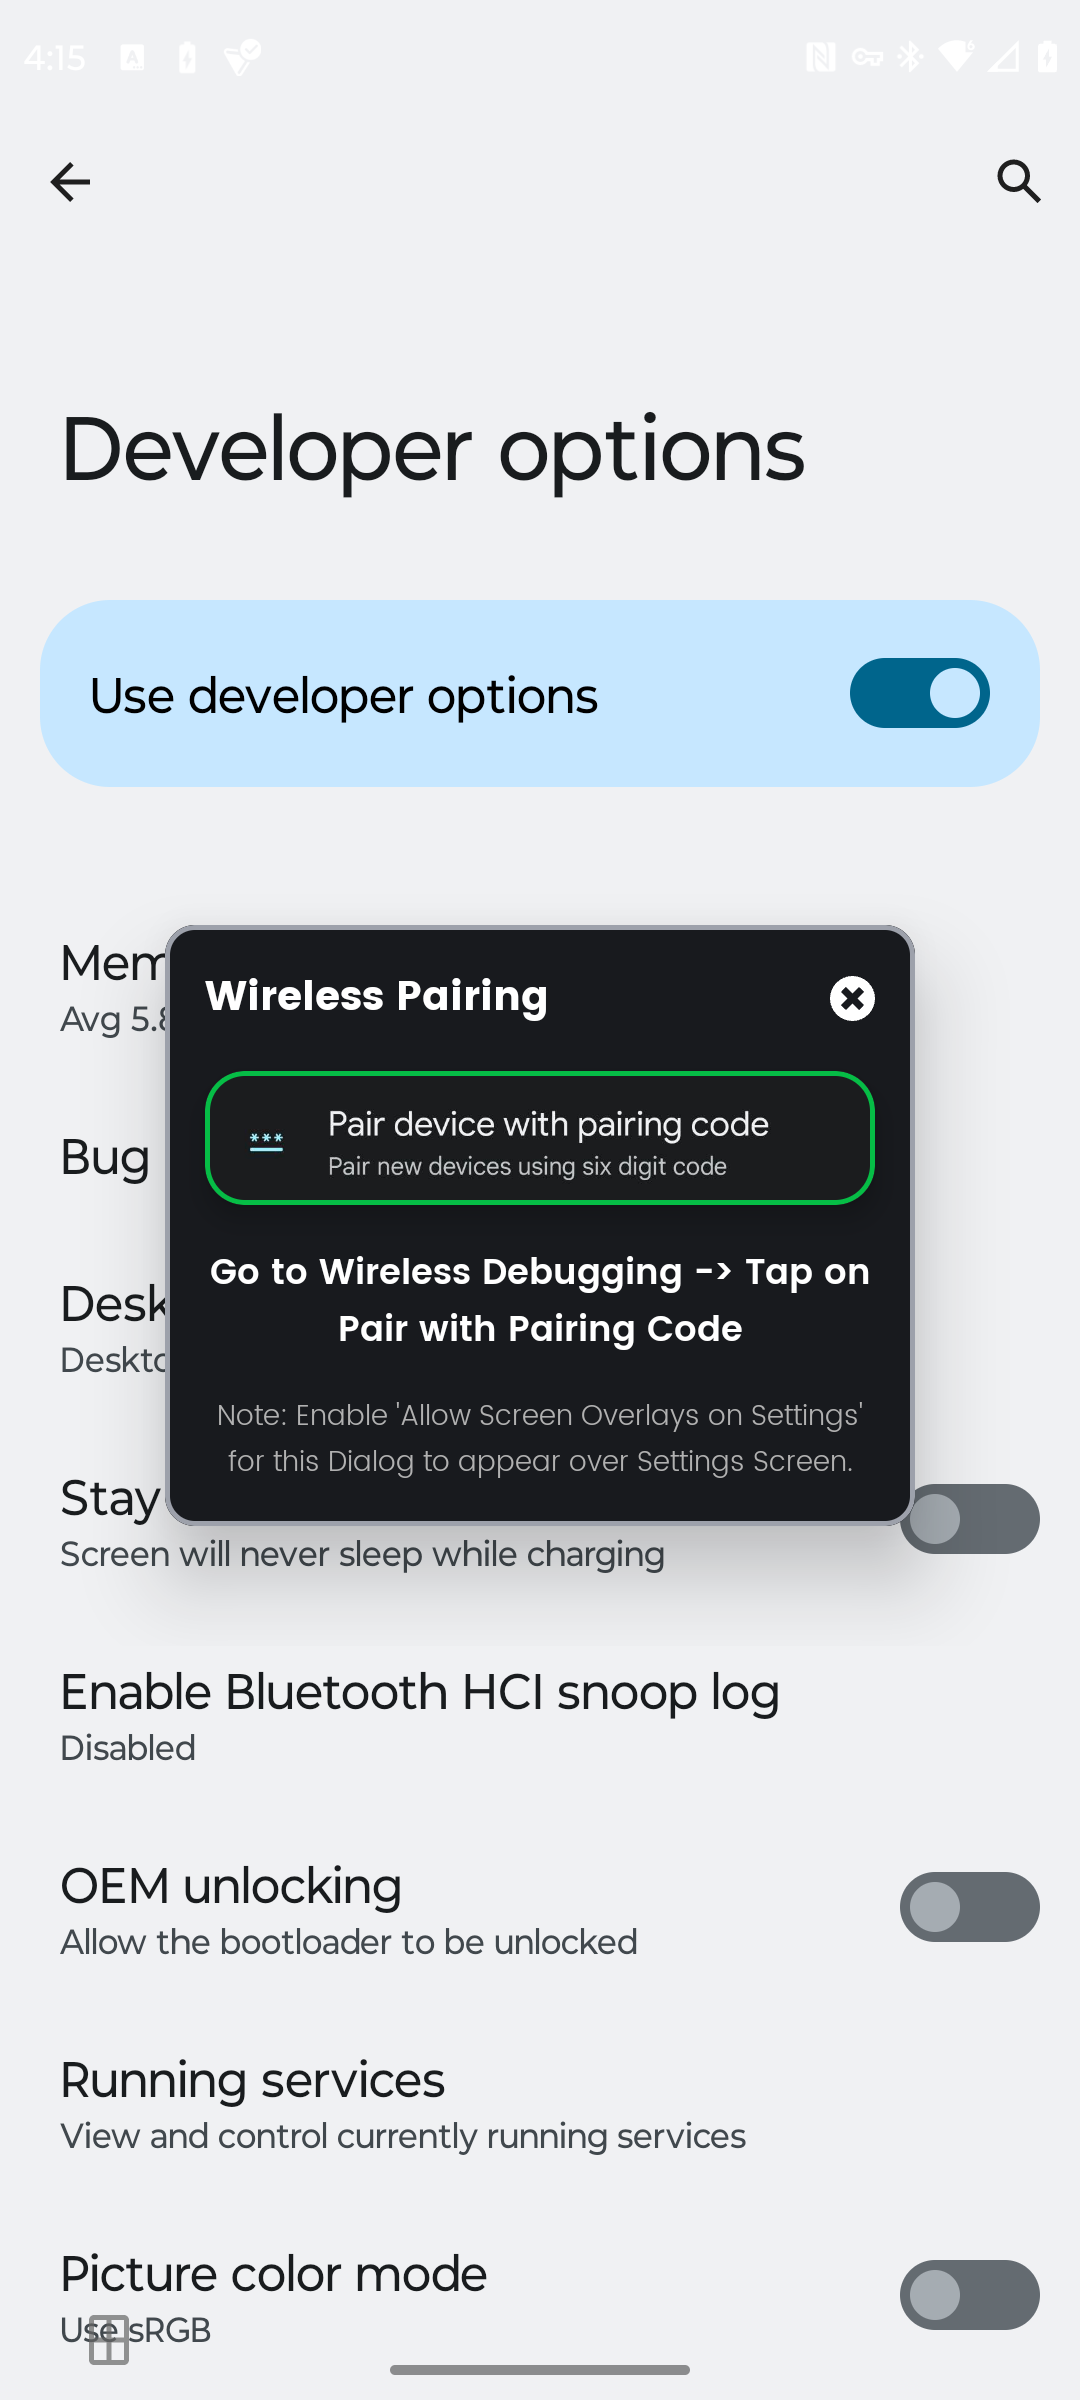
- Enable wireless debugging: Like USB debugging on Android , wireless debugging provides access to necessary parts of your phone.
- Pair via wireless debugging: Establishes a connection between Mantis Gamepad Pro and your phone.
According to the developer, this approach lets you enable and use physical controls without getting banned from playing certain games online.
As part of the setup process, you also need to connect a controller to your phone. Whether you use a Bluetooth controller with your Android device or a clamshell-style gamepad like the Raser Kishi V2 we reviewed , Mantis should detect your gamepad automatically.
Mantis Gamepad Pro isn’t your only choice if you want to get started with button mapping on your Android device. You should also consider alternatives like Octopus and Panda Gamepad Pro , which perform the same core function in different ways.
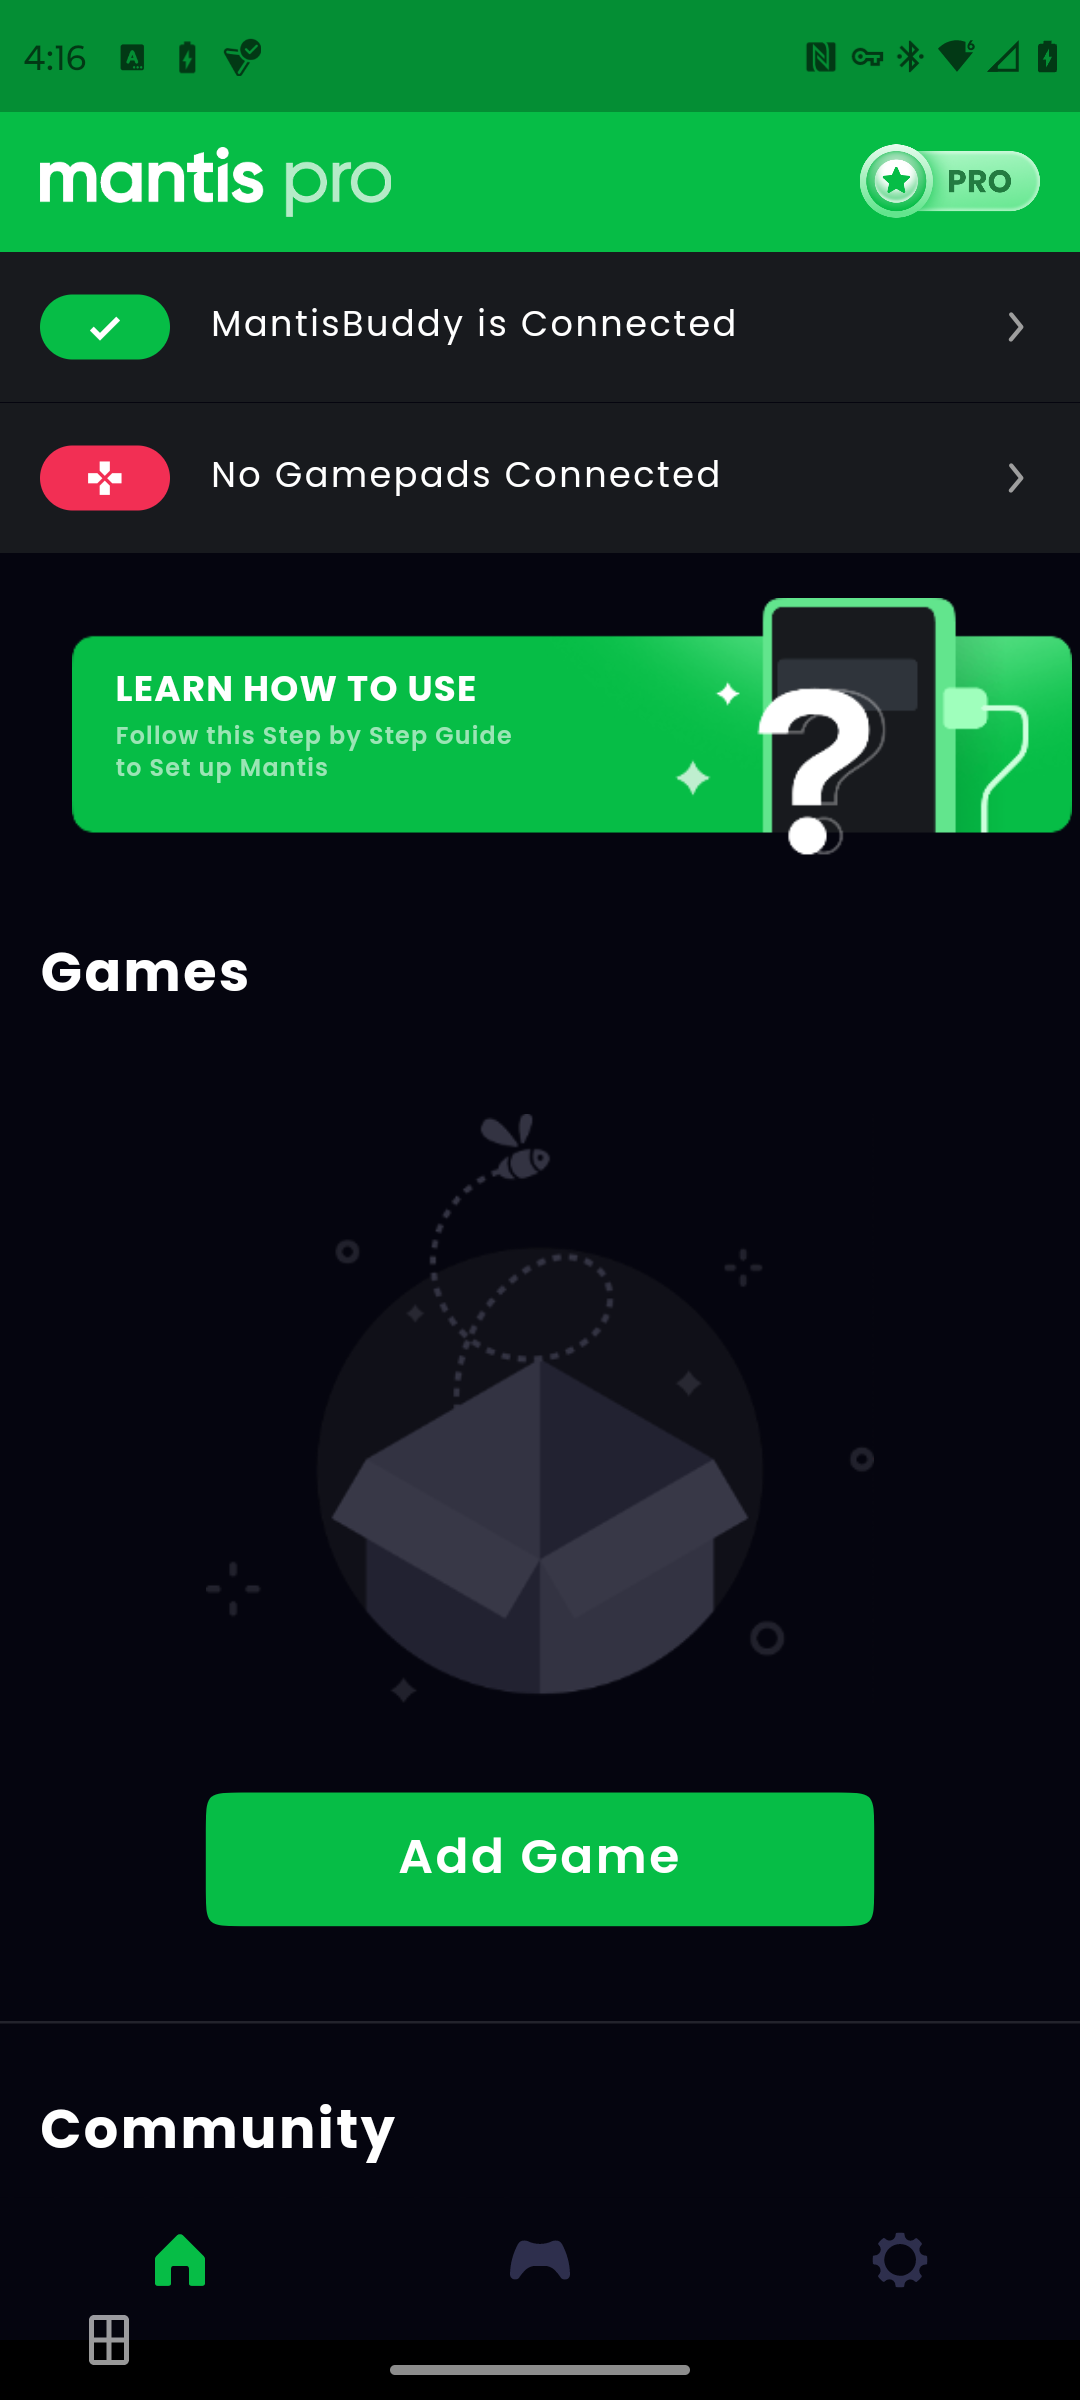
Button mapping software generally requires you to enable the feature per game. To do this in Mantis Gamepad Pro, follow these steps:
- Tap theAdd Game button under the Games section.
- Tap theplus (+) button next to the game you wish to use with Mantis.
- Look for the game under Games. You can now launch the game from within the app, though you don’t need to for the functionality to kick in.
Close
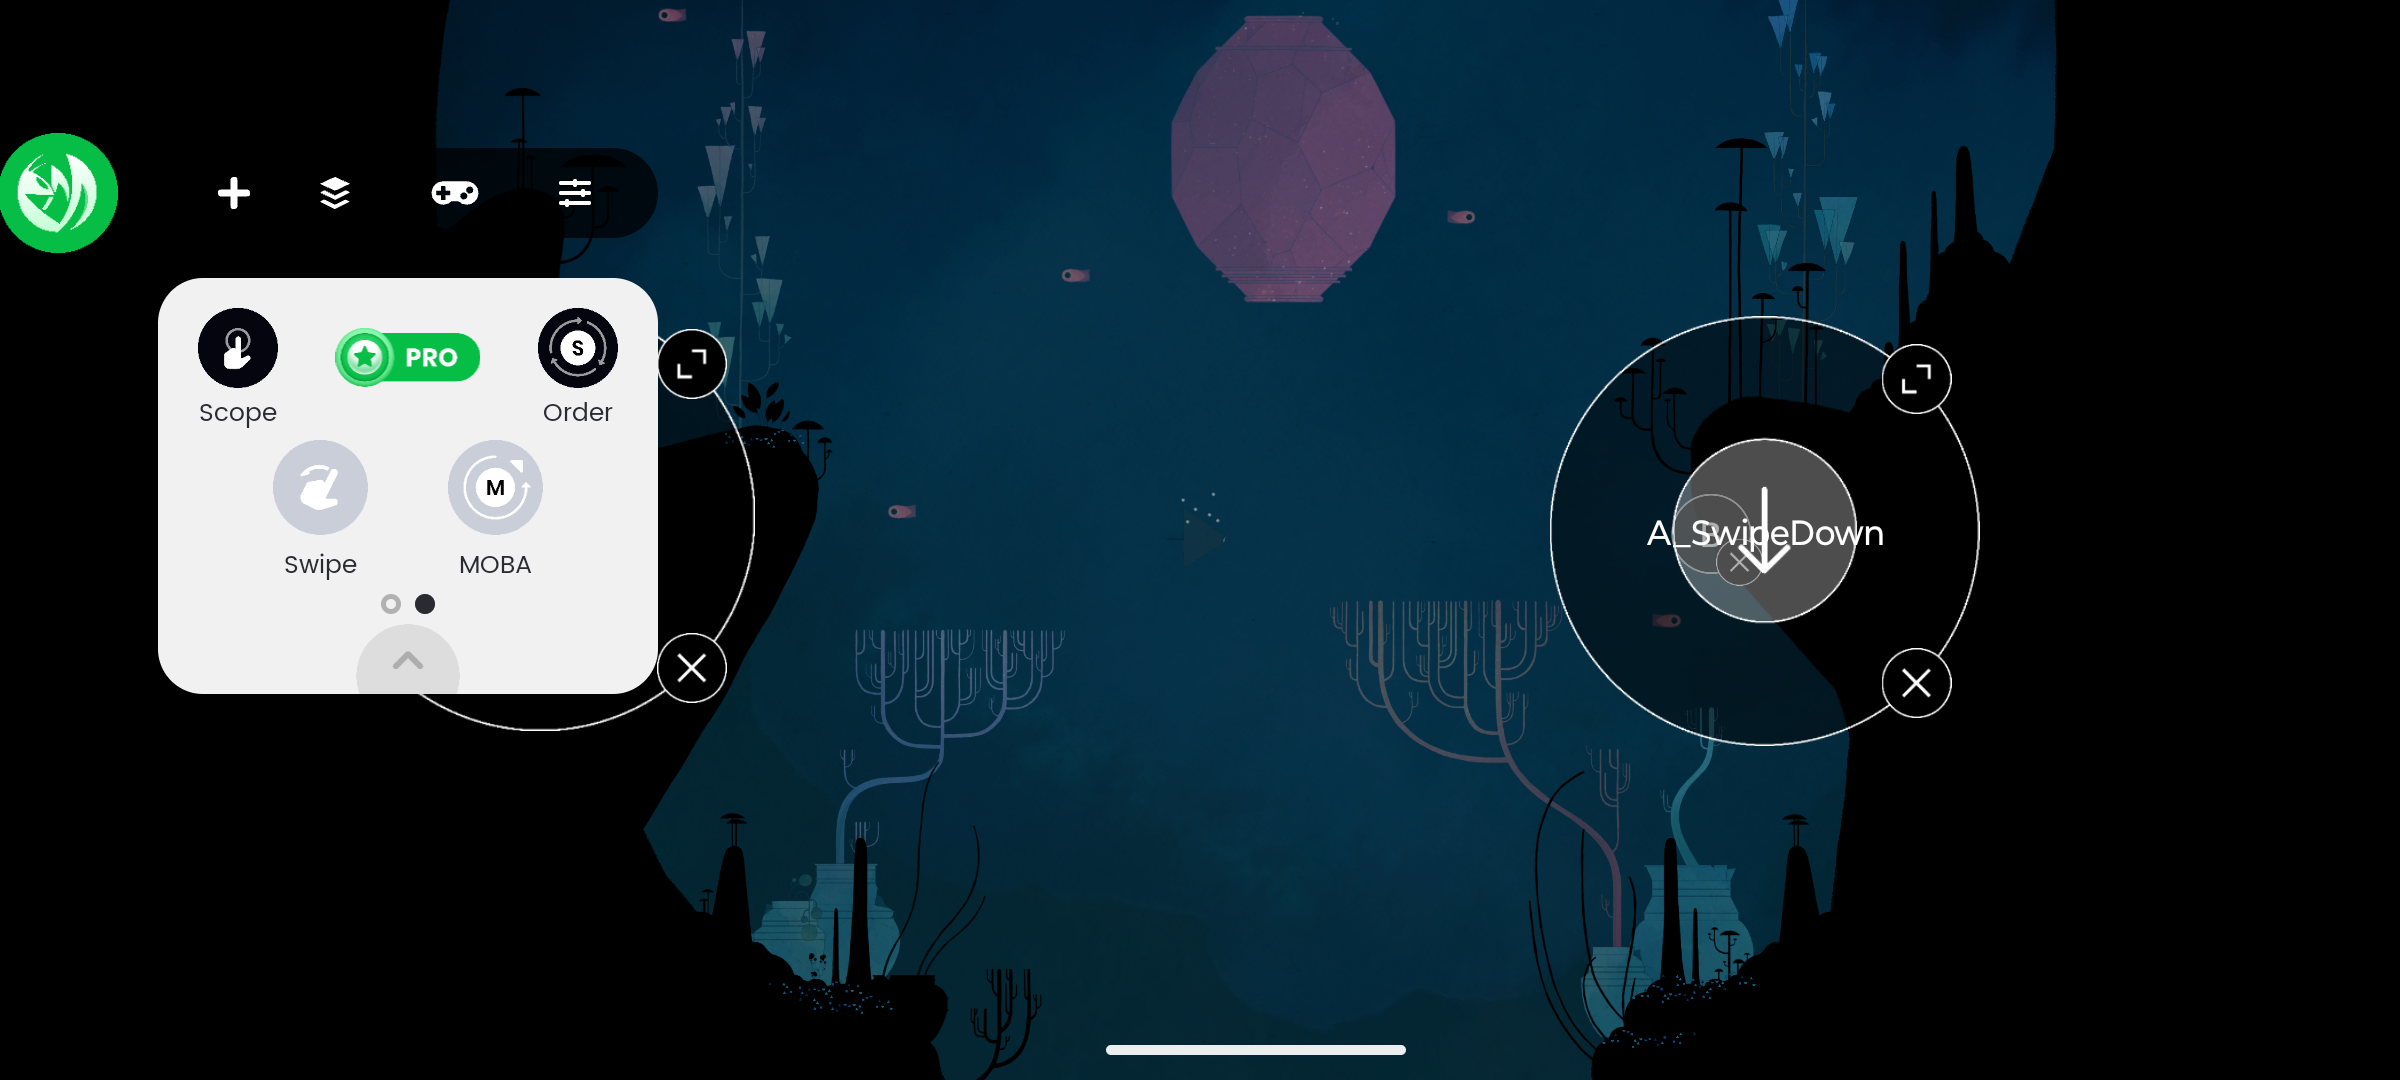
When the game opens, you will see a Mantis widget hovering on one side of the screen. Tap this widget to bring up the controller options.
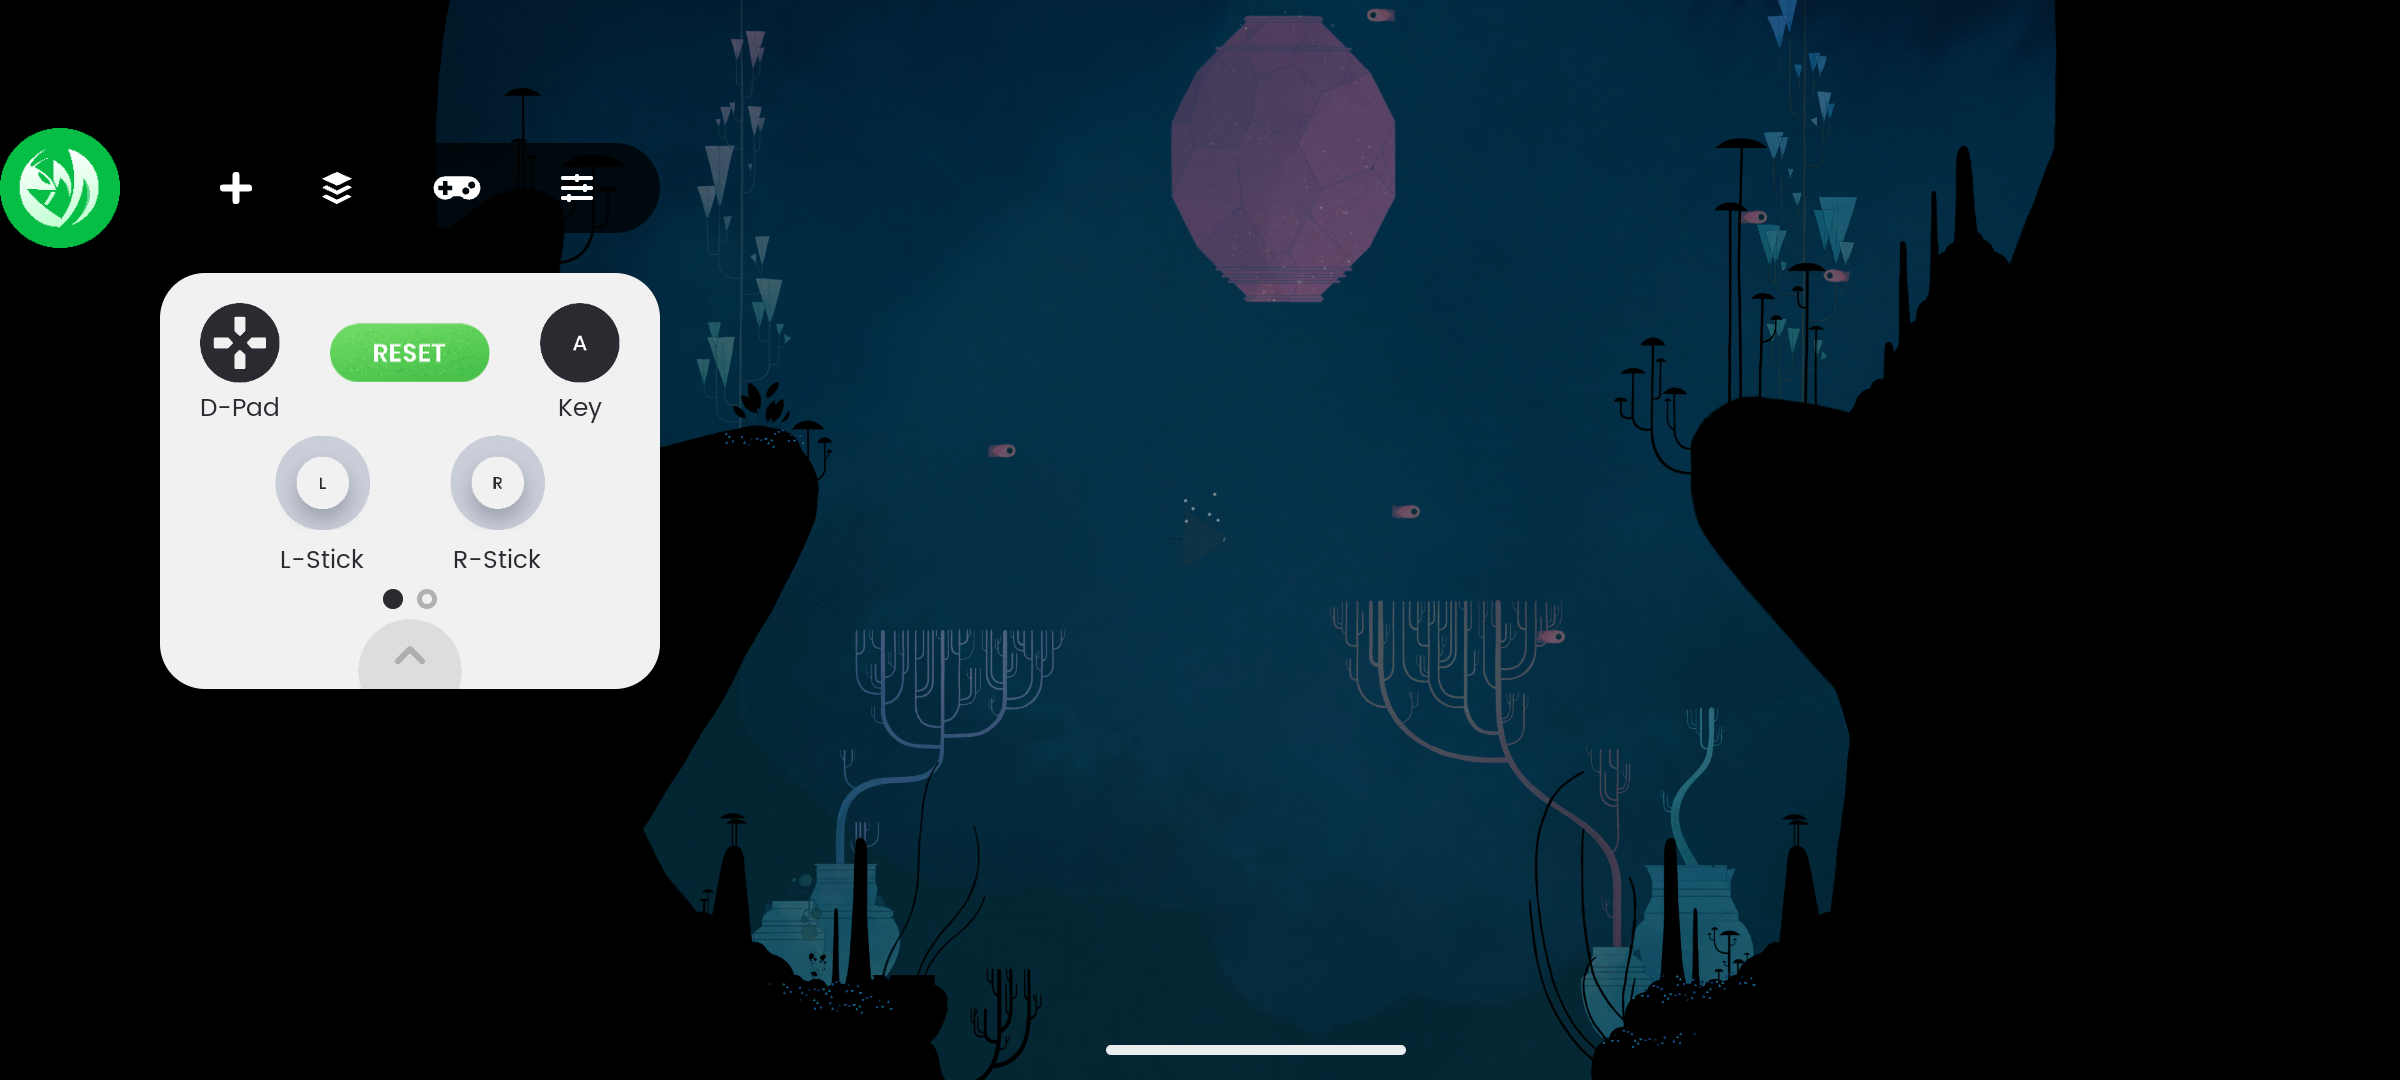
You can select each of the inputs on your controller, such as the analog sticks, face buttons, and triggers. You then drag where on the screen you want the button press to correspond to. Mantis Gamepad Pro also includes support for gestures, so you can make pressing a button the equivalent of swiping rather than tapping.
From here on, you’re good to go. The experience isn’t without its quirks, but it works with most games you throw at it. Just know that sometimes you may need to re-activate the Mantis app, especially after restarting your phone.
Button mapping won’t deliver as smooth an experience as native controller support since things like navigating menus and other UI elements that move around often will still require touching the screen. You may also encounter other issues at unexpected times, which can be resolved by turning off developer settings and only re-enabling them when you intend to use Mantis.
- Title: Mastering Button Controls: Android Games via Controller Mapping
- Author: William
- Created at : 2024-09-04 21:45:20
- Updated at : 2024-09-05 21:45:20
- Link: https://games-able.techidaily.com/mastering-button-controls-android-games-via-controller-mapping/
- License: This work is licensed under CC BY-NC-SA 4.0.